Stickin’ It to the Glue! My Method for Getting the Longest Wear out of Adhesive Tabs
Trying to find a good adhesive for your soft gel sets can leave you feeling a bit…stuck. There are too many options and sometimes the benefits come at a high cost! It’s tempting to have 2+ weeks of wear from a long-lasting nail glue, but if the only way to safely remove it before 10-12 days is to soak my delicate digits in a strong acetone bath I might have to give it a hard pass.
As a result, my go-to “glue” for applying soft gel tips is a sheet of thin adhesive tabs. With an average of 2-4 days of wear time, I get the perfect amount of wear for my needs - I change my nails like I change my clothes, and I like being able to remove a set without the hassle of solvent soaks and potential damage to either my natural nails or the temporary ones.

Avoid the Bulk - use a thinner adhesive tab (especially if you have flatter nail beds!) for a close fit
Sometimes I do want to keep a set on for a longer amount of time, maybe for a week long vacation or just to take a break from worrying about my nails. I’d figured out in the past how to get them to last for a while, but sometimes with that method the removal results could be hazardous for my nail plates!
Here’s an example:
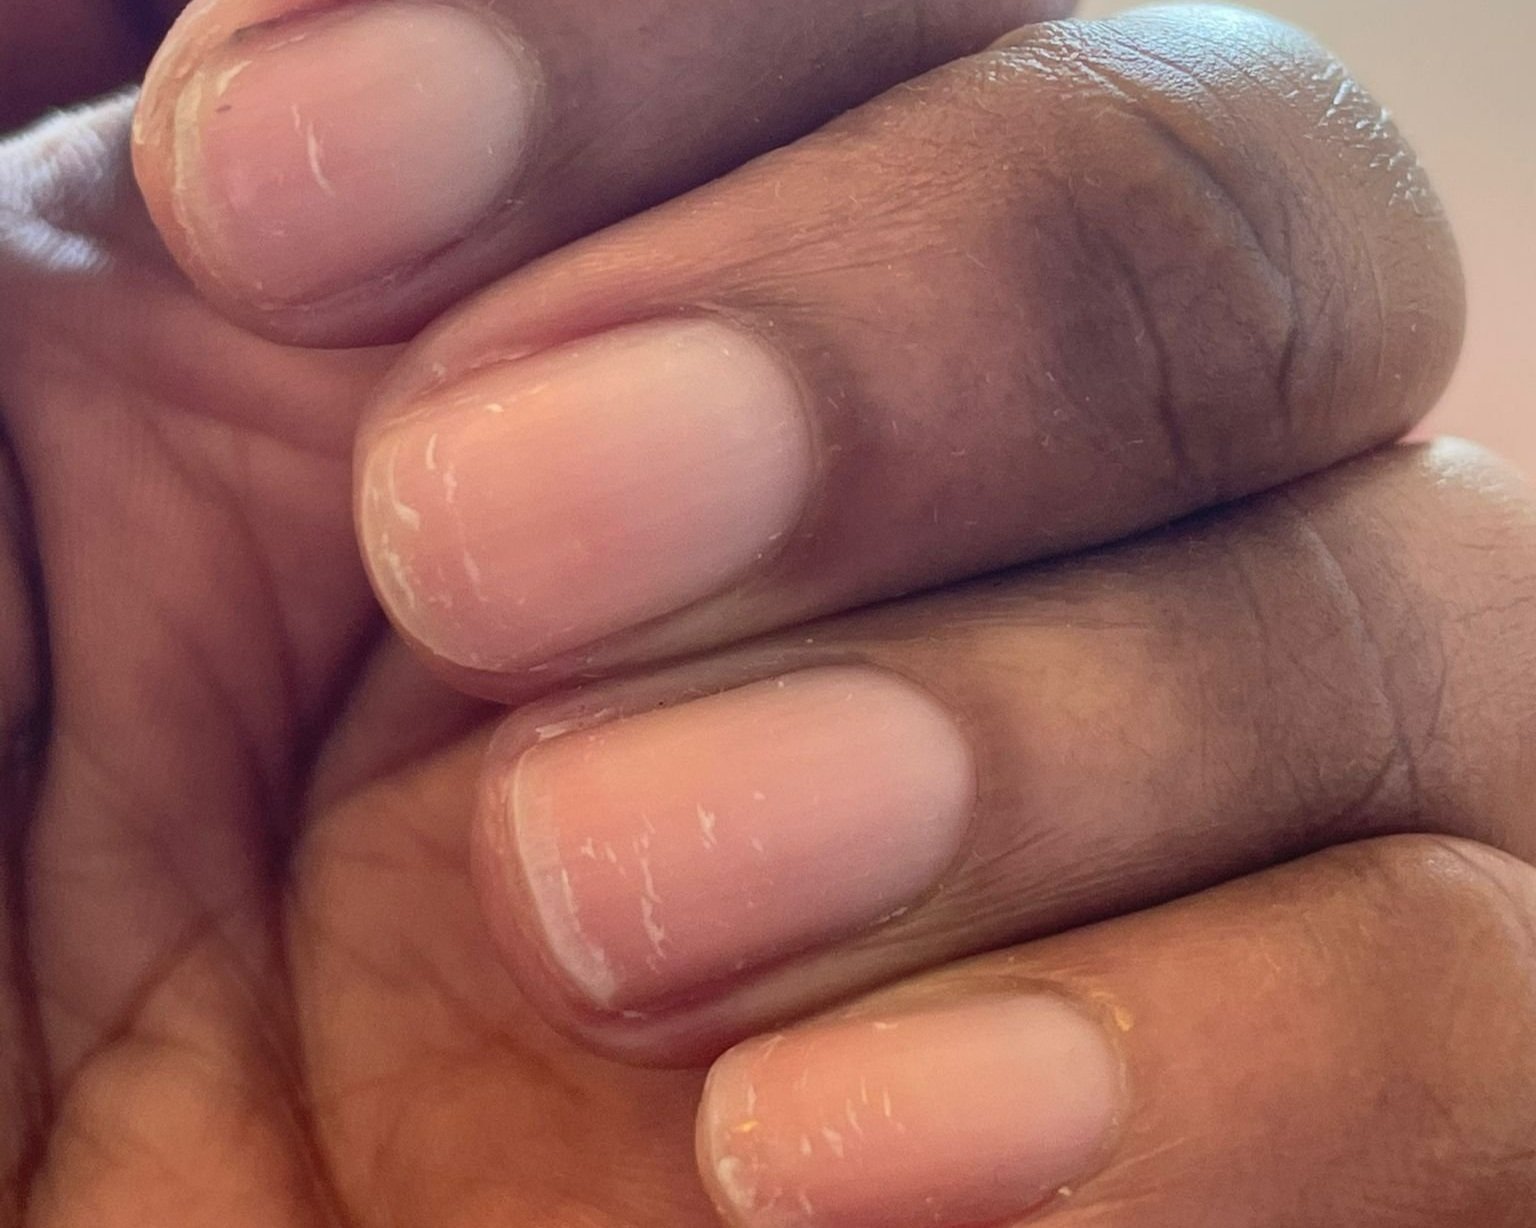
A Cautionary Tale - remnants of nail plate damage from removing adhesive tabs too soon, thankfully growing out
See those white lines of grown out damage near my fingertips? That came from an unexpectedly early removal of adhesive tabs from a previous set of soft gel tips. That’s actually the reason I’m trying different application methods - I’ve already figured out how to get them to stay on for a while, but it’s significantly harder to get them to last for a while and easily come off.
Now that I’ve been doing it for a while, I quite enjoy the freedom of painting my nail art on full cover tips! Originally, I tried it because I needed to free myself up for more hands-on tasks and couldn’t spend as much time drying and removing my nail art, but then I came to realize how much I loved the versatility of having whatever shape and length I wanted, whenever I wanted.
There’s still one major challenge, though: finding a good adhesive. One that would hold the gel tips securely in place for at least as long as I would wear a regular manicure (about 2-4 days) and that could be removed within that timeframe, or even on the same day, without acetone soaking or risking potential nail damage. It’s…a lot harder to find than you’d think.
Now that I’ve wrapped up my adhesive experiment test run for a newer, less finicky application method, I’m ready to share the results:

Up Close and Personal - No gaps in sight! Demi Oval Soft Gel Tips, painted with a neutral sheer polish and applied with adhesive tabs.
What You’ll Need:
Adhesive tabs, enough for all nails and a few extra (the ones that are too big/small will work fine)
Nail dehydrator, for gel or acrylic application
Nail primer, for gel or acrylic application
Foam buffer or a fine, soft nail file (240-400 grit), for prepping the surface of the nail
70% or higher alcohol and lint free wipes. Cut pieces of paper towels or disposable shop towels also work well!
99% acetone (and a clean-up brush, if you have one)
Double-ended cuticle pusher, preferably a metal or plastic disposable one that has a smooth surface.
Sticky Base Coat nail polish or Bonder Base Coat nail polish, lacquer not gel
The Steps:
Prep the nail:
Remove any previous polish with polish remover, with or without acetone is fine. If you need to shorten or shape your nails before applying the gel tips, you can cut or file them at this step also.
Using a foam buffer or a fine, soft nail file (240-400 grit), gently buff along cuticle and sidewalls. I personally prefer a file because the rounded edge gets closer to my cuticle and can start pushing it back, while the straight sides fit snugly up against the sidewalls.
With a cuticle pusher, gently push back the skin of the cuticle. This opens up more space to apply the tips, letting you slide them right up to the skin for a natural looking fit.
Wipe the nail clean and free of dust with an alcohol wipe, preferably 70% alcohol or higher.
Quick Tip: To save time and thoroughly wipe the cuticle and sidewall areas, try wrapping the alcohol wipe around the cuticle pusher and combine the two steps! The tool is much better than a finger at getting into those tight corners.
Prime the nail:
Dehydrate the nail with your preferred nail dehydrator. If you don’t have it, a half-and-half mix of 99% alcohol and 99% acetone on a lint-free wipe works well too.
When the nail is completely dry, apply the primer all over the nail, making sure to get close to the cuticles and sidewalls. I like to apply it in a light “push-and-pull” scrubbing motion, working the tip of the brush against the nail like scribbling with a pen. This makes sure that the liquid gets into all the little nooks and crannies on the surface!
Apply 1-2 coats of a Sticky Base Coat or Bonder Base Coat nail polish. This acts as a barrier for your natural nail from the adhesive while still providing a good, tacky surface for it to stick to.
Let the base coat dry completely, then wipe the surface clean with an alcohol wipe. The surface of the polish might become slightly matte or dulled - that’s ok!
Apply the adhesive tabs:
Now for the fun part! I find it easiest to apply all of my adhesive tabs first, so at this step I recommend finding the tab that fits the width of each nail, removing them from the sheet with tweezers, and placing them on the nail just above where the cuticle is - leave a gap about as thick as a dime.
Don’t remove the plastic film from the top of the adhesive tab yet! Massage the surface of the tabs for about 2-3 minutes, pressing them down into the nails to secure them well.
Before you move on, test the fit of each tip one last time to make sure you’re happy with how it looks and feels. If you need to pinch or shape it to get a more comfortable fit, you can do that at this step.
Apply the gel tips:
Stick one extra adhesive tab to the the pointed end of the cuticle tool, wrapping it around to secure it in place. This tool will be your best friend in this process!
Lay the sticky cuticle tool on top of the gel tip, pointy end toward the cuticle edge, and pick it up. With this you’ll be able to line up and place each tip perfectly without your fingers getting in the way.
Turn to reveal the underside of the gel tip. Dampen a cleanup brush or folded wipe with acetone and scrub the underside with it where your natural nail will be. The gel will soften and become slightly sticky and rough, allowing the tabs to grip the surface well and stick tight!
You must let the acetone dry completely. While you wait, you can push back the cuticles with the other side of the tool to make more room, then use the tweezers to remove the plastic film from the tab.
The final step! Line up the gel tip at the cuticle, angled upward from your finger at about 45° - think 3:05 on an analog clock. From cuticle to free edge, slowly lower the tip onto your nail and remove the cuticle tool. Press down firmly and rub all over the surface and sides of the nail for about 2-4 minutes to secure it well.
Congratulations! You’ve successfully applied your first of many nails.
Repeat this step for the remaining nails. I tend to work from pinky to pointer and save my thumbs for last, applying all of my left and right hand fingers first so that I can better pick up and handle the tools.
That’s all there is to it! I’ve worn a set for 7 days with this method and I was not gentle with those poor things! You can expect at least a solid week of wear, and possibly longer if you avoid prolonged exposure to hot, steamy, soapy environments - unfortunately, these adhesives don’t enjoy frequent soaks!
When it comes time to remove the set:
You’ll want to use a cuticle tool to work your way all around the gel tip, gently getting it under the edges on all sides. Your goal isn’t to pry the tips all the way off, just to get a little opening to let the remover slip underneath. Press a remover soaked wipe along the edges, letting the liquid flow under the gel tips. Now, working the cuticle tool underneath should be easier and the gel tip should release from the surface of the adhesive tab. From there, simply wipe your nails upward toward the free edge with the polish remover. The adhesive tabs don’t truly break down in the polish remover but will become soft and gummy, easily rolling forward and releasing from the base coat beneath as you wipe.
Note: 99% acetone is a strong polish remover and will break down soft gel with time! If you do not want to damage the design and intend to reuse these tips, please use a non-acetone remover or diluted acetone 50% or lower.
Hope this helps, and let me know how this works for you!
~ Leighton